

背景介绍
为什么要设置高匿代理?
在家和开放平台交互的时候,需要设置白名单,否则无法交互。家里的白名单一直变。
服务部署到服务器太麻烦,调试不方便。
于是就想通过代理的方式,让服务器替我发送这次请求,就可以解决这个问题。
当然,代理并不止这一个用户,其他还有很多用处,多用来隐藏自己,或者请求私域数据。
注意,使用代理注意安全,不要被人攻击了。注意网络安全哦。
系统配置
centos版本:7.5
不同版本之间有差异,centos8 会有问题,centos7.2 和 7.5 可行。
如何查看 centos 版本
cat /etc/redhat-release安装openssl(如果已安装,可跳过)
# 安装命令
yum install -y openssl
<h1 id="查看是否安装">查看是否安装</h1>
<p>openssl version -a
成功安装后,查看版本,就可看到下面信息

安装net-tools(如果已安装,可跳过)
# 安装命令
yum install net-tools
安装squid
# 安装命令
yum install -y squid
安装成功后的提示

修改配置
# 查看原配置 == 建议复制出一份来备份,防止配置异常没有参考
cat /etc/squid/squid.conf</p>
<h1 id="备份原配置">备份原配置</h1>
<p>cp /etc/squid/squid.conf /etc/squid/squid.conf.back
后续的配置,都是基于这个配置来做的,配置一个之后,如果还有其他需求,可以不保存,继续往下看。
修改端口号
# 端口号
http_port 3128
该端口号记得加入防火墙中。
# 防火墙操作添加白名单
firewall-cmd --zone=public --add-port=3128/tcp --permanent
firewall-cmd –reload
如果不会操作,建议直接关掉防火墙。
# 关闭防火墙
systemctl stop firewalld</p>
<h1 id="禁用防火墙">禁用防火墙</h1>
<p>systemctl disable firewalld
日志格式化
#此行加在配置文件末尾即可
#access log time human-readable
logformat squid %tl.%03tu %6tr %>a %Ss/%03>Hs %<st %rm %ru %un %Sh/%<A %mt
配置允许远程连接
# 在http_access deny all 前面,并把这行注释掉
acl client src 0.0.0.0/0
http_access allow client</p>
<h1 id="http_access deny all</code></pre><p></p><h2 id="heading-12">高匿配置</h2><pre><code># 配置文件的最后,加入下面配置">http_access deny all
高匿配置
# 配置文件的最后,加入下面配置</h1>
<p>request_header_access X-Forwarded-For deny all
request_header_access From deny all
request_header_access Via deny all
配置账号密码
先添加账号密码文件
# 安装工具
yum -y install httpd-tools</p>
<h1 id="创建密码文件">创建密码文件</h1>
<p>touch /etc/squid/passwd && chown squid /etc/squid/passwd</p>
<h1 id="创建用户密码">创建用户密码</h1>
<p>htpasswd /etc/squid/passwd [要配置用户名]</p>
<h2 id="输入两次密码">输入两次密码</h2>
<p>
配置 squid
#在配置文件的acl代码块下添加
auth_param basic program /usr/lib64/squid/basic_ncsa_auth /etc/squid/passwd
auth_param basic children 5
auth_param basic realm Squid Basic Authentication
auth_param basic credentialsttl 2 hours
acl auth_users proxy_auth REQUIRED
http_access allow auth_users
#添加
http_access allow all
#或注释掉
http_access deny all
squid 操作
# 重启
systemctl restart squid</p>
<h1 id="启动">启动</h1>
<p>systemctl start squid</p>
<h1 id="停止">停止</h1>
<p>systemctl stop squid</p>
<h1 id="开机启动">开机启动</h1>
<p>systemctl enable squid
配置参考
# 默认配置
acl localnet src 10.0.0.0/8	# RFC1918 possible internal network
acl localnet src 172.16.0.0/12	# RFC1918 possible internal network
acl localnet src 192.168.0.0/16	# RFC1918 possible internal network
acl localnet src fc00::/7       # RFC 4193 local private network range
acl localnet src fe80::/10      # RFC 4291 link-local (directly plugged) machines</p>
<h1 id="默认配置">默认配置</h1>
<p>acl SSL_ports port 443
acl Safe_ports port 80		# http
acl Safe_ports port 21		# ftp
acl Safe_ports port 443		# https
acl Safe_ports port 70		# gopher
acl Safe_ports port 210		# wais
acl Safe_ports port 1025-65535	# unregistered ports
acl Safe_ports port 280		# http-mgmt
acl Safe_ports port 488		# gss-http
acl Safe_ports port 591		# filemaker
acl Safe_ports port 777		# multiling http
acl CONNECT method CONNECT</p>
<h1 id="密码配置">密码配置</h1>
<p>auth_param basic program /usr/lib64/squid/basic_ncsa_auth /etc/squid/passwd
auth_param basic children 5
auth_param basic realm Squid Basic Authentication
auth_param basic credentialsttl 2 hours
acl auth_users proxy_auth REQUIRED
http_access allow auth_users</p>
<h1 id="默认配置">默认配置</h1>
<p>http_access deny !Safe_ports
http_access deny CONNECT !SSL_ports
http_access allow localhost manager
http_access deny manager
http_access allow localnet
http_access allow localhost</p>
<h1 id="接受所有 ip 请求">接受所有 ip 请求</h1><h1 id="acl client src 0.0.0.0/0">acl client src 0.0.0.0/0</h1><h1 id="http_access allow client">http_access allow client</h1><h1 id="接受所有请求==》白名单:不接受的使用拒绝策略,默认接受所有">接受所有请求==》白名单:不接受的使用拒绝策略,默认接受所有</h1><h1 id="http_access allow all">http_access allow all</h1><h1 id="拒绝所有请求==》黑名单:接受的使用接受策略,默认拒绝所有">拒绝所有请求==》黑名单:接受的使用接受策略,默认拒绝所有</h1>
<p>http_access deny all</p>
<h1 id="监听端口号,默认 3128">监听端口号,默认 3128</h1><h1 id="Squid normally listens to port 3128">Squid normally listens to port 3128</h1>
<p>http_port 3128</p>
<h1 id="默认配置">默认配置</h1><h1 id="Uncomment and adjust the following to add a disk cache directory.">Uncomment and adjust the following to add a disk cache directory.</h1>
<p>#cache_dir ufs /var/spool/squid 100 16 256</p>
<h1 id="Leave coredumps in the first cache dir">Leave coredumps in the first cache dir</h1>
<p>coredump_dir /var/spool/squid</p>
<h1 id="默认配置">默认配置</h1><h1></h1><h1 id="Add any of your own refresh_pattern entries above these.">Add any of your own refresh_pattern entries above these.</h1><h1></h1>
<p>refresh_pattern ^ftp:		1440	20%	10080
refresh_pattern ^gopher:	1440	0%	1440
refresh_pattern -i (/cgi-bin/|?) 0	0%	0
refresh_pattern .		0	20%	4320</p>
<h1 id="高匿代理配置">高匿代理配置</h1>
<p>request_header_access X-Forwarded-For deny all
request_header_access From deny all
request_header_access Via deny all</p>
<p>#日志格式化配置
logformat squid %tl.%03tu %6tr %>a %Ss/%03>Hs %<st %rm %ru %un %Sh/%<A %mt
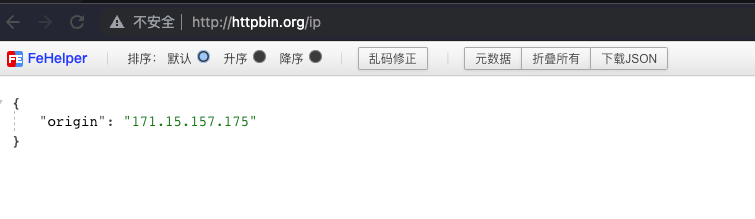
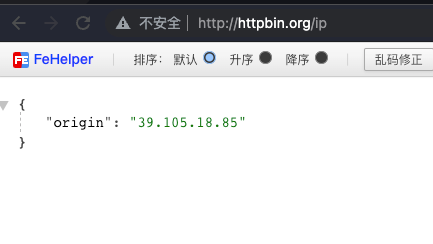
测试
测试接口
浏览器访问:http://httpbin.org/ip
可以看到目前访问的 ip,如果展示的是服务器的 ip,就是高匿代理。
如果展示服务器的和自己的,则非高匿代理
如果只展示自己的,则代理没生效。
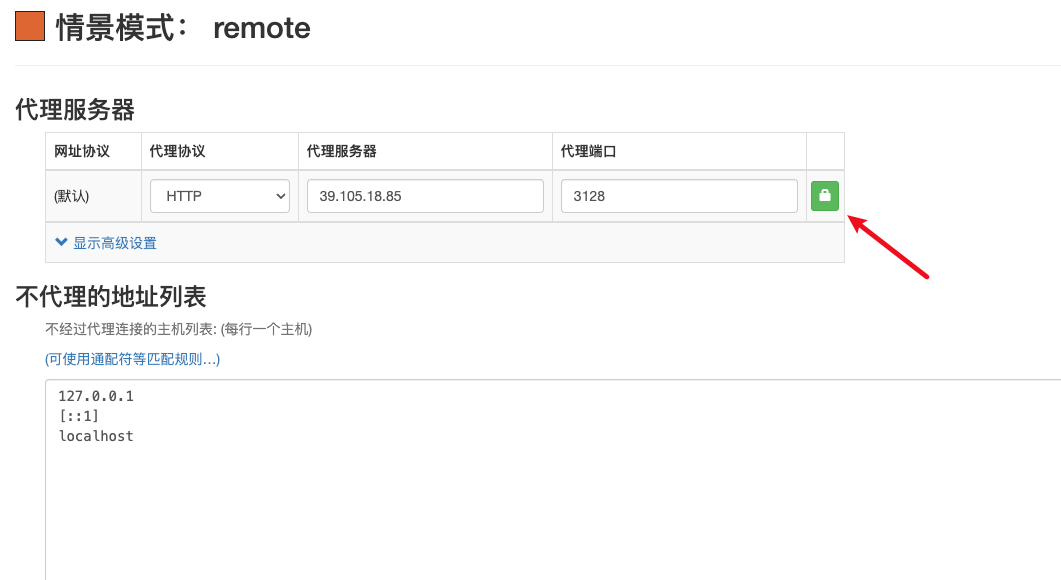
浏览器代理工具
chrome 直达:https://chrome.google.com/webstore/detail/proxy-switchyomega/padekgcemlokbadohgkifijomclgjgif
如果非 chrome,可以尝试在插件商店中搜索:Proxy SwitchyOmega
如果搜不到,可以自行 google 浏览器的其他代理插件。
点击小锁就可以设置密码


评论区